
Chris Mosley has been one of the lucky sim racers that was selected as community tester for Fanatec’s ClubSport wheel.
You can find his in-depth review that he originally wrote for the World of Mass Development forum below.
By:??Chris Mosley
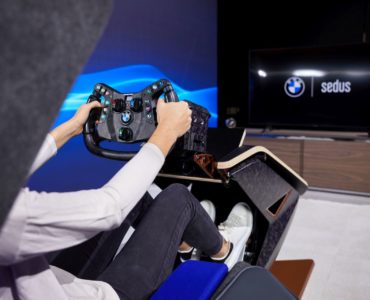
I was one of the lucky people to be selected to be a beta tester for the new Fanatec Sports Wheels and Club Sport Pedals (V2). Having raced real cars for the past thirty five years and??having played racing simulators since the early days of GPL and World Circuit I thought this was a great opportunity to try out this new equipment for the home racer. The units I tested??were the Club Sport Formula wheel, the Club Sport BMW wheel, the table mount, the base unit and the Club Sport Elite pedals.
1. Packaging of the equipment
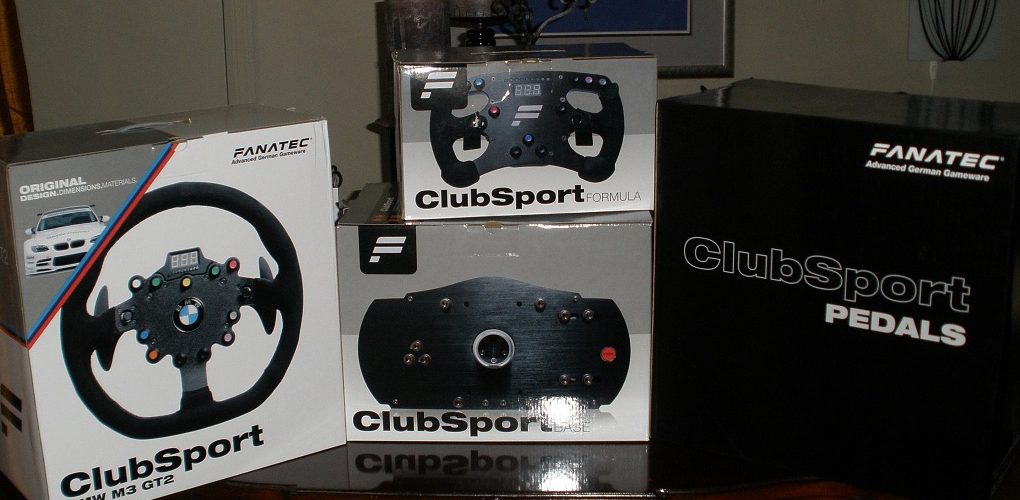
I am a firm believer in the old adage ???You get what you pay for??? and for thirty one years the company I worked for always said to us ???You only get one time to make a first impression.???I have to tell you I was impressed from the very first moment I opened the packages I received from Fanatec. I had selected to test the Club Sport elite pedals, the two wheels (BMW and Formula),??the CSR base unit and the table mount. The way they are packaged just sets the tone from the git go that these are quality pieces. Each unit was double packed in an outer case and the??unit packaging as you would see on a store shelf. Each unit was delivered separately boxed even though these are considered presale units (I assumed they would all be shipped together).
The boxes have pictures of the included equipment photographed from the front on the front of the boxes and from the left and right on the respective sides. On the back of the box is a picture of the contents along with the highlighted features of each piece. The box for the Formula wheel was kind of cool as it has a word on each flap to start building the excitement as you open the box to ??uncrate the unit. Starting with??? Fireworks???,??? Champagne???,??? Grid Girls??? and ???not included??? on the final panel. Inside the inner boxes, each unit was well packed with hard form fitted foam to prevent damage and movement during shipping.
Removing the unit and foam from the box you will find each unit packaged in a nice black drawstring tyvec bags like a fine bottle of wine. A really nice touch.These bags are useful for storage, especially the different wheels when not in use. It keeps them from collecting dust and keeps them nice and clean when you???re ready to plug them in and go racing. All of the necessary hardware was also packaged separately in the boxes. There was however, no literature packaged with any of the units. I found this to be slightly annoying. You???re paying good money for these units, I would expect to see some type of insert.
Rating = 9.5

2. The table mount
The table mount is the stoutest table mounting unit I have seen. The base has heavy duty 1/8??? solid steel plate with a nice flat black crackle finish. It measures 14.5??? wide and 6??? deep.??The lower part of the plate gives you 3??? of clearance below the top so it should be able to mount to almost any table or desk top. Below there are two adjustable knobs that are used to tighten??the base unit to the desk. They both have small, round steel plates with rubber pads that when tightened against the bottom of the table or desk will not let the unit budge at all.
No plastic or flimsy pieces here, just cold hard steel. They can be tightened enough that the desk will shake when you???re racing. I had several pictures fall over and to the floor when I ran off the track and ??through the infield while playing with rfactor. There are multiple pre drilled holes in the unit, although I haven???t figured out what most of them are for. There are four specific holes to mount to??the steering unit. The base itself is two pieces, one is the base which mounts to the desk or table and then there is the piece that attaches to the steering unit.
This piece pivots on a hinge, very similar to a door hinge. There is an angle piece that allows for adjustments to the hinge so you can adjust the angle of the wheel. Once mounted to the base, the wheel can be adjusted about twenty four degrees total (12 or so up and 12 or so down from level). You can set the angle of the wheel to your own personal preference. I like mine fairly flat. It is held in position by a half inch bolt. When you tighten this with the included wrench it won???t move at all. The only catch with the mounting unit is that you have to pull the pin out and separate the pieces to mount the base unit to the hinge plate then reassemble the hinge and then slide the pin back into the hinge.
Just a little bit awkward with the steering unit attached. Also included with the mounting is a unit to mount a shifter that can be mounted on either the right or left side. All screws, hardware and necessary tools to assemble were included. However, no assembly instructions were included with the table mount so it did take me a bit to figure it out. Once everything is together and tightened it won???t move no matter how high you turn up the force feedback. The desk will shake, rattle and roll but the wheel won???t budge. I would have rated this a 10 if they had included the assembly instructions.
Rating = 9.5
3. The base unit (steering unit)
Once again, I am impressed with the build quality of the unit. The front of the unit is a single quarter inch thick black anodized aluminum plate. There are a number of nice quality??allen screws that hold the face plate and the unit together. The top has a 6??? by 4??? clear window which allows you to look inside and see the drive unit and belts. Kind of neat to watch??when you are turning the wheel. Nice construction inside with the belts and wheels all visible. There is angle iron in the same black crinkle finish as the base plate on the unit???s bottom??that mounts to the mounting plate via the four holes I mentioned earlier. Each side of the base unit is heavily louvered to allow maximum air flow for cooling.
There is a fan on the right
side that starts as soon as the unit is fired up. It makes a small amount of noise but that will disappear as soon as you turn up the volume on your speaker system. The only plastic to be??found here is the rear cover and clear plastic window on the top. Just to the right of the steering column mount on the front panel is the on switch which is labeled as the ???start??? button. To turn on the unit you simply hold the button in for two to three seconds and the button lights up right red. The wheel automatically cycles all the way left and then all the way right and then returns to center. I suggest you stay clear of the wheel when you start it as it turns with quite a bit of authority. I mistakenly leaned forward during the cycling and it hit me on the
chin with a pretty good wallop!
Around the back of the unit you find the small panel for plugging in the power, a plug for data, the pedal set, shifter unit 1, shifter unit 2 and the USB connector. Make sure you plug??everything in before you mount your wheel to your desk or table. Once mounted the connection panel is very hard to reach to make connections. This is about the only downside of the base unit. But I have to take a full point away because if you have to get to the panel after you have assembled everything and mounted the base unit ??your table top, it will be a real pain??to get to the panel. Plus the combined weight of the mounting unit and the base is about nine or ten pounds.
Rating = 9.0
4. CSR Elite Pedals
The CSR Elite pedal unit is also quite impressive. Its construction is all steel and aluminum and quite heavy. It weighs about ten pounds or more and it has a fairly large footprint. It measures 13.5??? wide by 13??? deep. The height to the top of the gas pedal is 8.25???. Each pedal has an aluminum face plate about 1/8??? thick. The brake and clutch pedals are just like in a real car and are drilled with multiple holes to give you the appearance of weight saving. The gas pedal is a full sized pedal. The gas pedal has a nice smooth operation throughout??its full range of motion. There is a spring that is adjustable for more or less pedal resistance.
The brake pedal on the Elite set has the Load Cell unit. This makes the pedal feel like the brake pedal in a real car. As you press the pedal down it offers more resistance to a certain point, then it stops. To make the car fully stop you really have to stand on the pedal. To lock up the brakes takes a lot of foot pressure. It feels really good, unlike the pedals on my??previous set where you had to press and guess how much pressure you were really applying. You can easily modulate the braking pressure with this set. There are several adjustments??that affect brake pedal pressure. There is a spring that can be adjusted to give more or less pedal resistance but does not affect the braking itself.
The real adjustment is with which silicone oil (included) you use in the small reservoir attached to the load cell. This is what gives the pedal the real feel. Very much like a mini version of a brake reservoir in a car. It comes??with two different viscosities, light oil and a heavier one. Remove the small cap ad fill the chamber, push the pedal down until all the air is out, top off the chamber and cap. I chose the heavier oil which offers a very stiff resistance about two thirds of the way down.
The pedal stops but you still haven???t locked up the brakes. At this point you really have to push harder on??the pedal even though it isn???t moving you can modulate with your foot just how much pressure is being applied, just like my real racecar???s brakes. There is also a small potentiometer on the brake pedal for sensitivity. The settings range from off to ten. I haven???t played with the settings on this. I just set it to ten and it felt just right.
The clutch pedal is unique also. Push down on the pedal and it offers smooth resistance till about midway down, then it sort of pops like you???re feeling the clutch engage. Really cool. I really like these pedals. The pedals can be adjusted right or left so you can make them closer for heal and toe driving.
Rating = 9.5
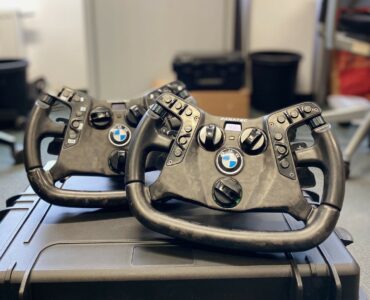
5. The Wheels: Formula and BMW Sport Wheels
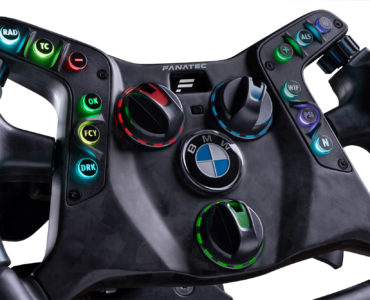
The two wheels that I received for testing are both new. There is the ClubSport BMW M3 GT2 wheel and the ClubSport Formula wheel. The quality of construction on both??wheels is right up there with the base unit and the pedal set. Each has a solid metal face plate and spokes. Each has black suede covers. Each wheel has the same number of buttons (11) and mini joy sticks(2). Each wheel has paddle shifters, rev lights and a small read out panel. They both have quick disconnect rings that allow for quick changing??of the wheels.
All of the electrical connections are built right into the center of the disconnect column. The wheels will only go onto the steering column one way so there is no worry that you will cross or damage the connections. Pull back on the disconnect ring, line up the notch on the wheel with cutout on the steering column, slide the wheel into position,??release the ring, turn on the base unit and you???re ready to go racing. It takes all of ten to fifteen seconds to change the wheels. As mentioned earlier in this report when you turn on??the wheel it will cycle through it???s entire range and then back to center. Do not try and hold the wheel during the cycling, it is very forceful. While the wheels are very similar they are very different in the way they feel when in use.

The readout screen displays important setup information. When the wheel is activated the readout displays the driver version and then firmware version for several seconds. There is a??small button called the tuning button located to the lower left of the screen that is used to turn on the display screen after the initial startup. On the screen you can adjust the various??functions of the wheel.
These are adjusted using the mini joystick on the right side of the wheel. There are five presets you can use so you can adjust and save you settings for different??games. You can set the wheels Sensitivity (Sen) read that as rotation (from 90 to 900). The Force feedback (FF) from 10 to 100%, Shock Vibration(SHO) the feel of the engine vibration
10 to 100% or off, AbS vibration, the amount of braking vibration, Lin, linearity, dEA, deadzone setting, for for the force feedback strength, from off to 400 with 100 set as the default, Drift Mode (DRI), SPr, spring setting (not used in PC settings), dPr, damper setting controls the amount of dampening .??There is a free aftermarket program available that will make use of the screen and rev lights.
The BMW GT wheel is large. It is 12.5??? in diameter, but feels much bigger. This may have to do with the fact that I have been playing with a Logitec MOMO wheel for many years now.The MOMO only measures 10??? wide. It???s only 2.5??? larger, but it just feels BIG! The rim of the wheel is covered in black suede and it feels very comfortable. The suede is a nice touch as??it absorbs some of the moisture from your hands and still allows you good grip on the wheel. There are small extensions on the rim at ???ten and two??? on the wheel for more grip. It feels ??like a real wheel. The paddle shifters are at ???nine and three??? behind the center spokes and extend 2??? above and below the center line of the wheel. They are easy to reach even when the
wheel is turned and your hands are at odd angles.
There is a small readout screen about 2??? above the physical center of the wheel. It displays various information (see separate description) and is very easy to see and read. There is a row of small rev lights just under the readout. There is an official looking BMW Propeller insignia right in the center of the wheel.??As I mentioned earlier there are 11 buttons and 2 mini joysticks on the wheel. All eleven buttons are arranged along the outside edge of the wheels hub. The mini joysticks are at the ???nine and three??? positions of the hub. These can also be used as buttons. There are five buttons above the center line and six buttons below the center line of the wheel. This is sold as a GT wheel??and it feels right for driving GT cars and older sports cars.
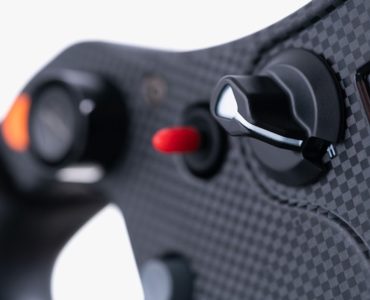
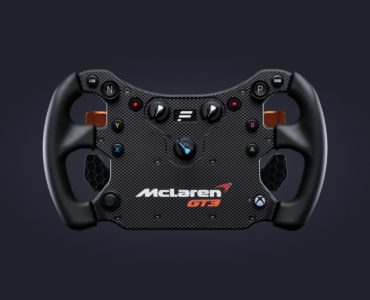
The Formula wheel is rectangular in shape. It measures 10.5??by 6???. It also has suede like material on the grips. It has 6 buttons located across the top of the wheel (three on each side of??the top rim nearer the outside of the wheel). As in the GT wheel the mini joysticks are located at the ???nine and three??? positions on the wheel. There is also a button located just above and??just inside of each of the mini joysticks.
The other three buttons are located in a triangle at the lower center of the wheel. The paddle shifters are located just behind the wheels center spokes??at the ???nine and three??? positions. On the Formula wheel these shifters are much smaller. Measuring only 1.5???inches in length. They are well placed and easy to use except when the wheel is turned beyond 90 degrees. Then the smallness makes them difficult to reach easily. There is a digital readout screen at the top center of the wheels hub and a row of rev lights located just above the readout screen.
As I mentioned earlier the build quality of the GT wheel is great but the layout of the buttons on this wheel just doesn???t feel natural. Of the five buttons across the top of the wheel hub??only two on each side are reachable without taking your hand off the wheel. The button in the center position is just not easily reachable while in the midst of a fender to fender race. You have to take your hand off the wheel and then locate it with your eyes to use it. I found it very distracting and ended up not assigning anything to it.
The only upside to this button is that it is colored bright yellow so that helps you to locate it quickly. Similarly there are two buttons across the very bottom of the wheel hub that are as equally difficult to locate and use while ??you are racing. Both of these buttons are black in color and are difficult to locate visually while you are racing. I found that because of the largeness of the wheel that the buttons located below the wheel???s center line were not easy to locate and use during a race.
Most of the Formula wheel???s buttons are in better positions, likely because the wheel is physically much smaller. There are three buttons on each upper edge of the wheel. I found these to??be the easiest to use. You can feel them with your thumbs and it???s not necessary for you to take your eyes off the screen to use them. Likewise, you can assign uses to the mini joysticks and those are located right at thumbs length. The three buttons at the bottom of the wheel are in a bad position for me. They are not easily reached and require you to take your eyes off the screen for just a moment to use.
The quality of these wheels is exceptional but I had to take points off for the buttons not being in an easily usable position.
Rating: BMW Wheel = 8.5
Formula Wheel = 9.0
6. Total setup
Once I received all of the individual items (Wheels, base, table mount, pedals) it was time to set them up. I pulled out the table mount, the GT wheel, the base unit and the pedals. I looked in all the boxes and I thought to myself that I must have missed the instructions somewhere. So I checked all of the boxes again. OK, no setup instructions. So I quickly logged??onto the Fanatec web site and downloaded the manual. I know a lot of companies started doing this many years ago (I am old school I guess)but I think if you???re paying this much for something a manual should be included in the price of purchase. Once I had the manual in my hands setup was a breeze. The manual is clear and precise. The hardest part of the setup was getting the silicone oil into the chamber on the pedals. As I mentioned earlier all of the necessary hardware and tools for setup were included in the packages.
I setup the tabletop mount and the base unit first. This required separating the two pieces of the mount. I had to get a hammer and a long screwdriver to drive the pin out of the hinge??so I could match up the four holes on the base plate with the four holes on the base of the base unit. Using the screws provided this took all of a minute or two. Then I reattached the hinge of the mount to the mount itself. This was a little harder now that the base unit was attached. Once secure I attached them to my desk top.

Next I opened the chamber on the pedal set and proceeded to fill it with the heavier of the two supplied vials of silicone oil. I used the heavier oil as I wanted a nice stiff feel to the??brake pedal. I then put the pedals where they were would be a comfortable reach for my feet. Following the diagram in the manual I hooked up the extension wire and went to plug it into the base unit. Dam! I had to unhook the base unit and loosen the pivot so I could get to the plug panel. While unattached to the desk top I plugged in the other two wires (power cord and USB connecter) then remounted the table mount to my desk top. I looked at the clock, OK this is taking a little longer than I thought. Now the pedals were connected,
the base unit plugged in and now I just had to attach the wheel.
I removed the shipping pin and pulled back on the quick release collar and slid the wheel onto the column. It wouldn???t??find home. I removed it and tried again. Same result. Tried it again. Same result. What???s the description of insanity? Doing the same thing over and over and expecting a different result.??So I decided I needed to look at the collar while I pulled back on it. Sure enough the collar was not fully retracting as it was getting caught on the last coil of the spring inside the collar.
Easy to fix, just take a small screwdriver and push the coil back into place. I have had this happen on my racecar. It???s a real eyebrow raiser when you go to leave the pits and the wheel??comes off in your hands. After this happens once or twice you learn to test it as soon as you put it on, before you start driving anywhere. Once I fixed this it did not repeat itself again no matter??how many times I changed the wheels back and forth. Now I???m ready to go even though I had several screws and clips leftover. These must have been extras because I setup everything by the book.
Load up the driver (we testers were provided with test drivers and firmware). The firmware was already in the wheel. Start up the software, test the wheel and we???re ready to go racing.The software was self loading. It took maybe a minute for it to complete. When you open the program it recognizes which wheel you have mounted. There really isn???t much to see here as all??of the settings are done on the wheel itself. All said and done, it took me a little more than an hour from start to finish to complete the setup of the wheel and pedals. I do realize that some??of the time was due to my own incompetence but I am deducting 1 point for the lack of instructions being shipped with the unit.
Rating = 9.0
7. Game Play
So let???s get started. There are three games I spend a lot of time playing, rfactor, GTL and the new game pCars. I have always been more of a GT driver than an open wheel driver. I think that must be because I have always found it easier to drive the GT cars than the formula cars in most games. The formula cars always feel way too edgy. Off to GT Legends. We???ll pop on the BMW GT rim. Hold in the start button for a couple of seconds, release and the unit comes to life. I have found that it is important to make sure the wheel??is on and running before entering a game. If I turn it on after I have entered the game I find that sometimes the wheel does not respond to any input. It becomes necessary to go to the wheel configuration screen and check at least one setting before the game recognizes the wheel.
We???ll go to the controller screen and assign the various functions to the wheel buttons. Remember that the mini joy sticks can also be assigned functions. This gives you 13 possible buttons??(actually more because you can assign four separate functions to each of the mini joy sticks). In GTL you can???t possibly use all of them unless you use them for seat adjustments and other??things like that. It???s really simple, just click on the function you want to assign to a button on the wheel with your mouse and then push the button on the wheel you want to assign that function??too. First thing you will notice is the numbering of the buttons.
At least here in GTL the buttons across the top of the wheel are (from right to left) 8, 7, nonfunctioning button 1 in center, 6 and 5.??The mini joy sticks are referred to as RX+ and RX- when moving left or right and RY+, RY- when going up or down. There is no real order to the button numbering on the lower half of the wheel. I use the paddle shifters to shift even though the early GT cars didn???t have these. I didn???t opt for the shifter unit so this will have to suffice.
Since I???m testing the BMW wheel I am going to drive the BMW CSL from the GT76 cars. I???ll pick one of my favorite tracks, the 1977 version of Le Mans by VLM and run a full field of GT76??cars. Just a note here, I do not use any driving aids when driving. In GTL the force feedback has always felt odd from the first time I used the wheel and I found it necessary to change the settings to use the reverse effects. I have set the FFB effects to 100% in the game and 100% on the wheel. I set the steering sensitivity to 270 to match the movement of the steering wheel??in the game. I have also set the abs vibration at 95%. This is a neat feature that provides feedback to the wheel and the brake pedal itself in the form of slight shaking as you begin to reach??maximum braking.
After adjusting the settings for my car it???s time to start it up and go for a few test laps. First thing I notice is a very slight shaking of the wheel as the car starts and idles. This is??the engine vibration. This is always there and can be felt as you accelerate away from the pits and onto the track. Turn in is strong but eases up after the initial turn in. The return to center??is just enough to feel real. The track surface is smooth and there are some small irregularities and these are felt in the wheel as a slight pull to the left and right. Up over the curb and there is a good??amount of quick vibration in the wheel to let you know you???ve hit the curb solid. As you come up over the first rise to the Dunlop Bridge you can feel the steering go light as the car crest the hill. Nice touch. Down into the esses and again a little lightness in the wheel as you crest the rise leading into Tetra Rouge.
Hard on the brakes and I can feel the pedal and the wheel shaking informing??me that I am nearing the braking limit. Turn in, feel the wheel fighting, hit the apex and accelerate onto the Mulsanne with a tad of opposite lock. Wow, the wheel and pedals feel great. Much like I would expect a real wheel and pedals to feel. A long interlude as I motor down the three mile Mulsanne. Heavy braking into Mulsanne corner, again wheel and pedal shuttering as I reach the braking??limit. Accelerate out too quickly, quick left, right with the wheel to save car. Unfortunately there is some lag in the feel here. I can catch the car but the FFB lags just a little when making very quick transitions like trying to save a car about to spin. Accelerate down to Indianapolis and brake into the right hander.
Pushing on the pedal you can feel the resistance and modulate the pressure so as not to lock up the wheels. Left and then right at Arnage and accelerate to White House and the Porsche curves. I over accelerate exiting the first curve and I feel the wheel go light as the car begins to spin. Quick left, but too late. Bouncing through the grass the wheel goes right , left, right , left then bang. Into the Armco and a quick jarring of the wheel. All I can say is wow. That really feels??cool. Feels completely different than my Logitec MOMO wheel. A goodly percentage of that is due to the pedal feedback and response. Also, the wheel just feels so much better.
This wheel and??pedal set is so much more immersive than my other set. I feel like I can drive much quicker. After using the wheel for a while I have noticed my times are quicker with this set than my times with??the Logitec wheel and pedal set. A lot of this has to do with the Clubsport pedals with the load cell. I feel I can dive much deeper into the corners because I can feel just what the brakes are doing.??My only complaints about the wheel are that some of the buttons are too far to reach comfortably, you have to actually move your hand off the wheel to reach in and push them.
It also requires some cases that you have to look at the wheel to find the button. This can be very distracting when you???re racing wheel to wheel. Also when you reach the maximum turning point to the left or right with the wheel it shudders quite badly. And it is a shame that the LED screen has no use in the game. There???s a nice row of rev lights and a screen just perfect for a gear indicator or other display info. Well maybe down the road either Fanatec or some bright modder will write a program for each of the games that puts this to use.

I???m going to run rfactor HistoricX and select the same BMW to compare the way the wheel feels in rfactor. I am using a ???real feel??? setup posted by a user ZeosPantera. It is a combination of??LEO FFB and Zeos???s own settings. Again I have set the FFB to reverse setting to get the right feel. If I use the standard setting the wheel continues to turn in to the corner and that is just??not right. I am going to use roughly the same exact car setup I used in GTL so I can compare as closely as possible. As the car starts I can feel the wheel shaking very similar to the feel in??GTL, although here it feels just a little stronger. As I pull away from my garage and turn the wheel right, right away I can feel the difference in the FFB from GTL.
This has a much more ??connected feel. When you turn in there is more resistance to turning as you would feel in a reel car without power assisted steering. Once out on the track it just feels amazing. Little pulls in the wheel as you hit bumps in the road surface. Ride along the grass verge and the wheel shakes convincingly. Up over the crest and under the Dunlop bridge and the wheel gets light and then??settles back in. Down the hill and I can modulate the brakes without locking them as I turn in for the esses. Out of Tetra Rouge I hit the accelerator and the rear breaks away and I apply opposite??lock and power slide onto the Mulsanne.
As I power down the Mulsanne again the little dips and bumps cause the wheel to dart right and left with more authority than it did in GTL. At the end of ??the Mulsanne I can really feel the brakes feeding back to me and it is with a little effort I can slide into Mulsanne corner and again power out with opposite lock full on. Exceptional! Of course I ??blow it in the Porsche curves just as I did in GTL but once again all the feelings are magnified.
So I needed to have some kind of base to truly understand how good this wheel and pedal set really is. Here is what I did. I decided I would do side by side comparisons with my MOMO wheel??set. I chose the BMW CSL in both rfactor HistoriX 1.9 and GTL GT76 at VLM???s Le Mans 1977 in both games. I used some very basic and similar setups for both of the cars, brake bias, ride height,camber and gearing. I did ten laps with each car and each wheel/pedal combination. I recorded the best lap from each set below.
Before you read the results I have to tell you there was absolutely no comparison in the FFB between the two wheel sets. The MOMO wheel FFB was dull and almost nonexistent in GTL and little better in rfactor. The Fanatec wheel in GTL felt good but in rfactor with ZEOS FFB program it felt alive and exciting. So here are the lap test results:
MOMO Wheel and Pedal set at VLM LeMans 1977 driving BMW CSL = in GTL a best lap of 4:38.2
MOMO Wheel and Pedal set at VLM LeMans 1977 driving BMW CSL = in rfactor a best lap of 4:33.7
Fanatec Clubsport Wheel and Elite pedal set at VLM LeMans 1977 driving BMW CSL = in GTL a best lap of 4:28.4
Fanatec Clubsport Wheel and Elite pedal set at VLM LeMans 1977 driving BMW CSL = in rfactor a best lap of 4:25.2
I decided that I should do the same type of comparison in pcars. I chose the Palmer/Jaguar prototype as the car I would test. I like the Palmer as it is similar to my previous real racecar an OMS designed by Steve Owen in the UK. Again I chose to drive at LeMans (Loire in pcars due to licensing).
The FFB in pcars is pretty good. It has all the correct elements, the proper turn in feel, the right brake feel and the lightness of the wheel when you crest a hill. What is currently missing in pcars (remember it is a beta) at Loire is any road feel. The road surface is just too smooth. Other than that the FFB feels similar to the rafctor feedback. I did not notice any
steering lag. So how did I do in the ten lap comparison?
See below:
MOMO Wheel and pedal set in pcars at Loire in the Palmer = best lap 4:08.2 (and struggled to get there)??Fanatec Clubsport BMW wheel and Elite pedal set in pcars at Loire in the Palmer = bets lap of 3:53.1 (at this writing the best time in the world with the Palmer)build 249.
As I mentioned earlier in this report I gave the Formula wheel a higher rating because the buttons were easier to reach during game play. I have to tell you also that when I ordered the??wheels I really expected that I would like the GT wheel better than the Formula wheel as I don???t play open wheel mods as often as I do GT ones. But I found that when using the Formula??Wheel and Elite pedal set I was able to drive some of the Formula car mods very well.
In fact I had set the fastest world record lap at Rouen in pcars in the Formula B several times with each new build made available. The Formula wheel has grown on me and I currently like it better in pcars and with some of the mods in rfactor. As for GTL, well you can???t use a Formula
wheel in a Legends GT machine. The BMW GT wheel feels just right for GTL and the HistoriX mod for rfactor.
Rating for GT wheel in GTL = 9.0
Rating for GT wheel in rfactor = 9.0
Rating for GT wheel in pcars = 9.0
Rating for Formula wheel in rF = 9.5
Rating for Formula wheel in pcars = 9.5
Objective Overall Rating for the BMW/Formula wheel with Elite pedal set = 9.2
Subjectively I would give this a 10. I am enjoying the hel* out of this!
In summing up I think what you have here are some very good products. The build quality is superb. The set is made with robust materials and should hold up well in the long run.??It looks great on your desk and once mounted with the table mount will never move. The amount of available adjustments means it can be adjusted to fit almost any game and anyone???s preference in feel.
The Elite pedals with the load cell feel so real it???s uncanny. Together the wheels and pedals make any sim so immersive you???ll forget about things you were supposed to??get done until your significant other comes in to remind you. My complaints are few (button reach on GT wheel, non-working rev lights and the lack of any printed instructions). I know the printed instruction thing is probably just me, but I really like having some type of manual. If I was in the market for a new wheel and pedals I would have to consider these at the top of the list.